This CrackMe was a pleasure to complete! It was decently difficult for my level and I definitely learnt a lot. I was the 6th to submit, though I could have probably been faster if the release aligned with my timezone and I didn’t spend that much time outside 😄. Nevertheless, I won the main prize for the writeup contest!
Much appreciation to hasherezade for designing this CrackMe as well as releasing all her amazing tools that aid analysis.
| Details | Links |
|---|---|
| Official Contest Announcement | https://blog.malwarebytes.com/threat-intelligence/2021/10/the-return-of-the-malwarebytes-crackme/ |
| Official Contest Summary | https://blog.malwarebytes.com/threat-intelligence/2021/11/malwarebytes-crackme-contest-summary/ |
| Github Gist Version of Writeup | https://gist.github.com/rainbowpigeon/1d6e3997a050e2b3bd6e67846c2c7085 |
Overview
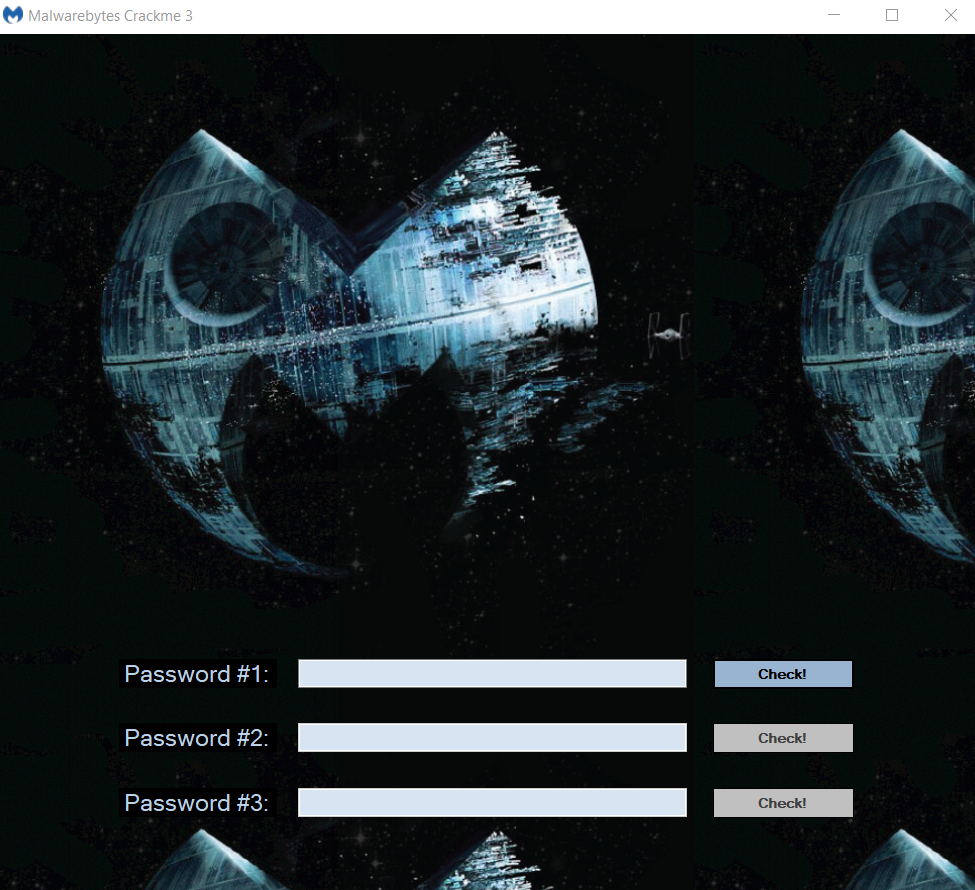
The challenge file MBCrackme.exe has 3 password-check buttons for 3 stages.
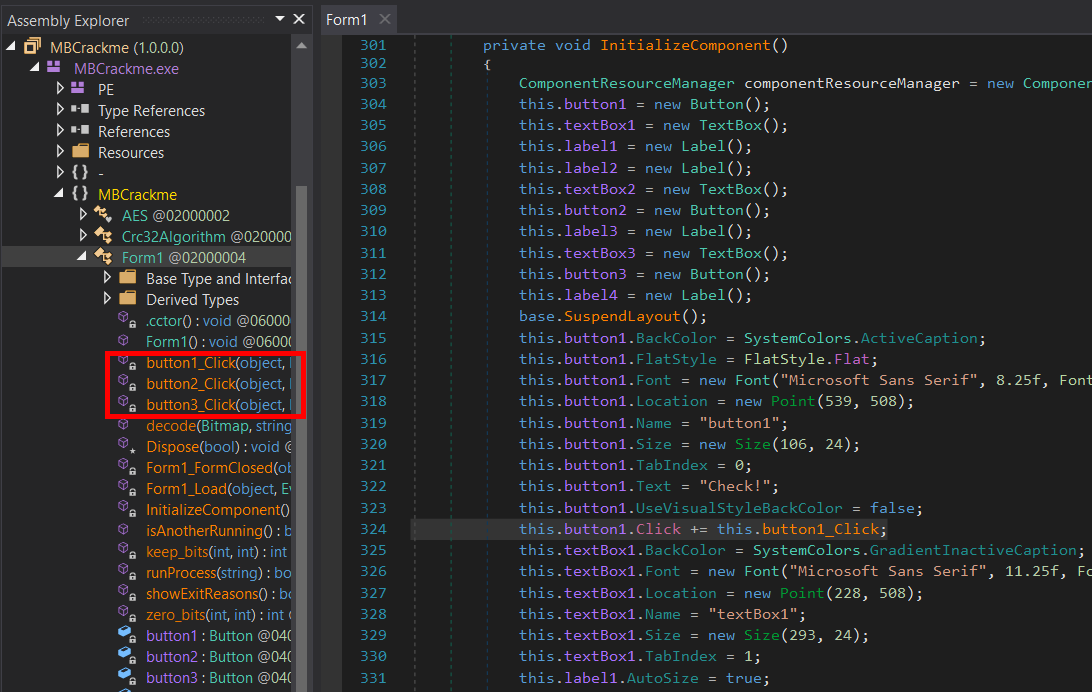
Detect It Easy says it is a 32-bit .NET executable, so let’s pop it into dnSpy for analysis!

The program’s entry point calls
Application.Run on Form1 which calls InitializeComponent() to register on-click event handlers named button1_Click, button2_Click, and button3_Click for the 3 password-check buttons respectively.
Stage 1
button1_Click
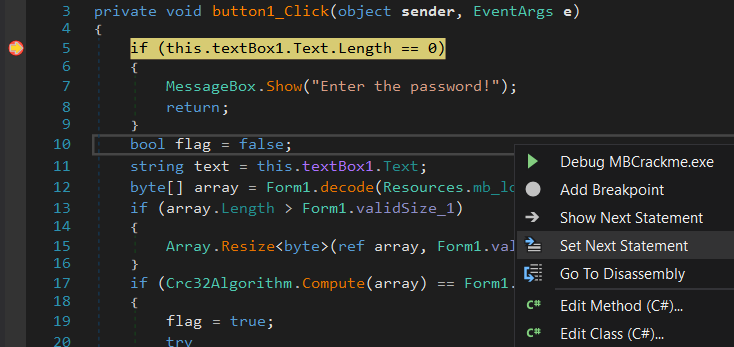
In button1_Click, our input text is first checked to not be empty and then passed to Form1.decode along with Resources.mb_logo_star.
|
|
Steganography
The function decode loops through each pixel of the mb_logo_star bitmap resource and constructs a new byte b by using bits from the RGB value of the pixel. 3 bits are taken from the Red value, 3 from the Green, and 2 from the Blue — slightly different from the usual LSB steganography.
The new byte b is then XOR’d with a byte from our input text and stored in a new array that is returned by the function.
|
|
The array with the decoded bytes is then resized to validSize_1 = 241152; if it is larger than that. Finally, the CRC32 checksum of the bytes is calculated and checked against validCrc32_1 = 2741486452U;.
|
|
If the checksum of the decoded bytes in array is correct, the bytes are written to g_serverPath which is Path.Combine(Path.GetTempPath(), "level2.exe"), i.e. %TEMP%/level2.exe.
runProcess is then called which will basically execute the decoded level2.exe with ProcessWindowStyle.Hidden.
Obtaining The Password
Since we know that the decoded level2.exe would eventually have to be a valid PE to be executed, and PEs usually contain many null bytes especially in the headers and towards the end, the bytes extracted from the mb_logo_star resource before any XOR decoding should actually contain snippets of the password in plaintext since (password byte) XOR (password byte) == (null byte).
While debugging MBCrackMe.exe in dnSpy, I set a breakpoint at the 1st input text length check and I clicked on the button to submit password 1 without actually entering anything. I stepped over the length check and continued running inside the Form1.decode function.
Since my input text is empty, the 2nd length check of
if (bytes.Length != 0) inside decode would fail and the extracted bits from the mb_logo_star resource would not be XOR’d with anything.
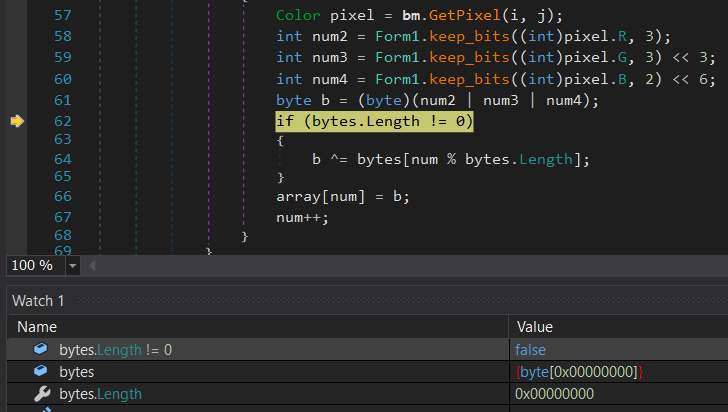
I continued running out of the
decode function and until after the array has been resized. Inspecting the memory contents of array now, we see the plaintext password!
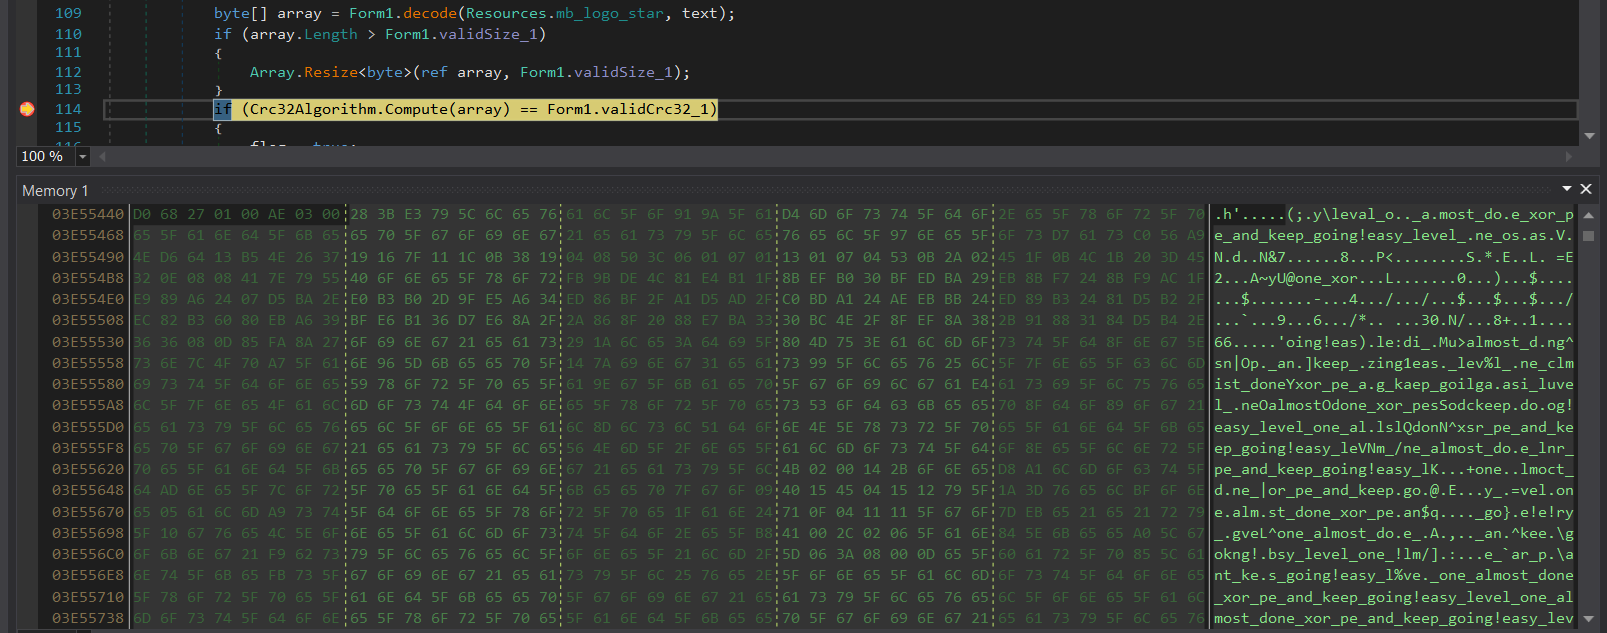
At this point, we can also save the contents of
array and XOR decode it manually in CyberChef to give us what would be level2.exe.
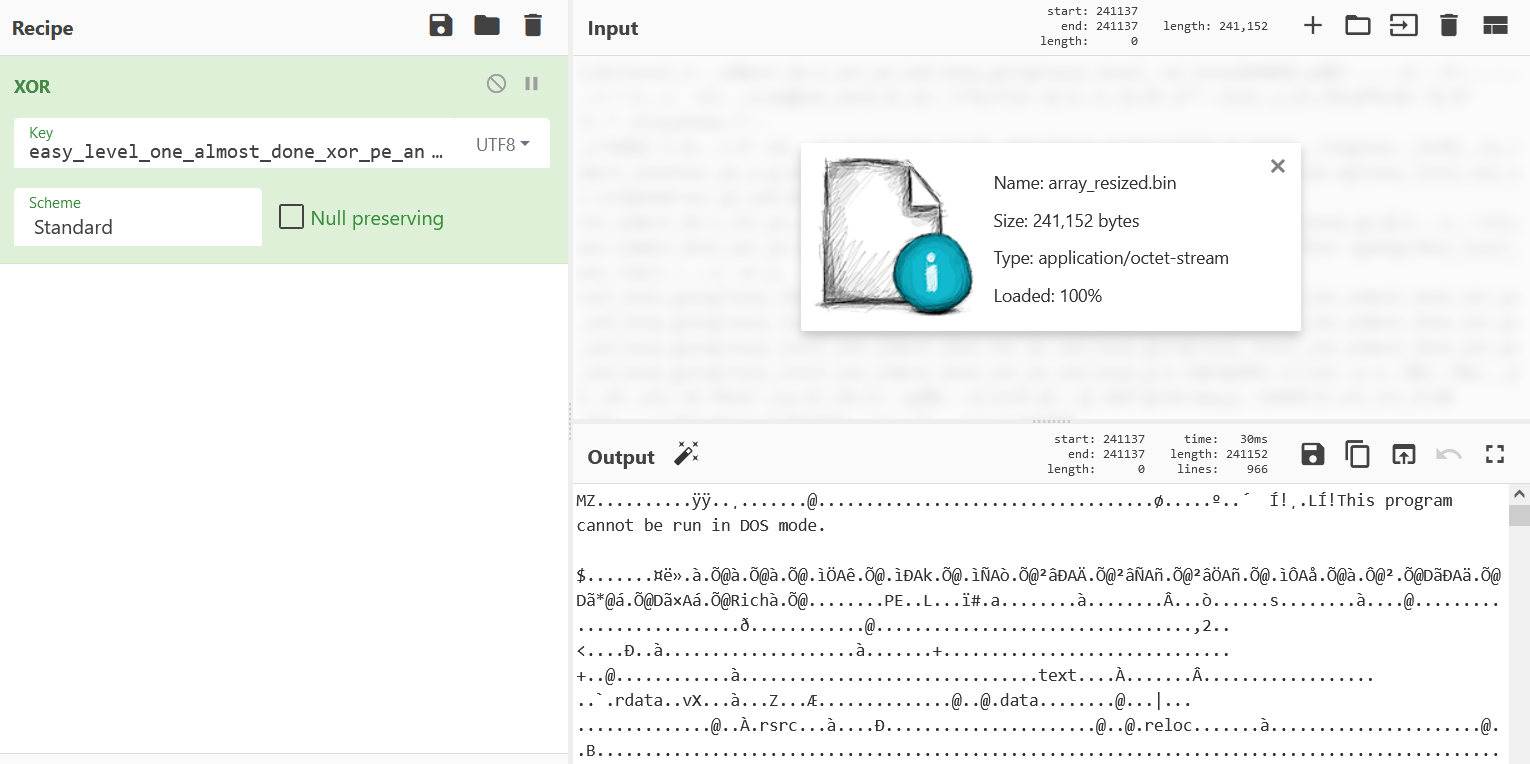
Stage 1 password:
easy_level_one_almost_done_xor_pe_and_keep_going!
Stage 2
button2_Click
Before analyzing level2.exe, let’s take a look at code for the 2nd button click back in the .NET executable.
Just like before, the input text is checked to not be empty and then written to the named pipe crackme_pipe. A response is read back from the pipe into array and checked to have a CRC32 checksum of validCrc32_2 = 499670621U. If this passes, LoadNext.Load(Form1.g_serverProcess, array) is called which will be for Stage 3.
|
|
level2.exe
Dynamic WinAPI Resolution
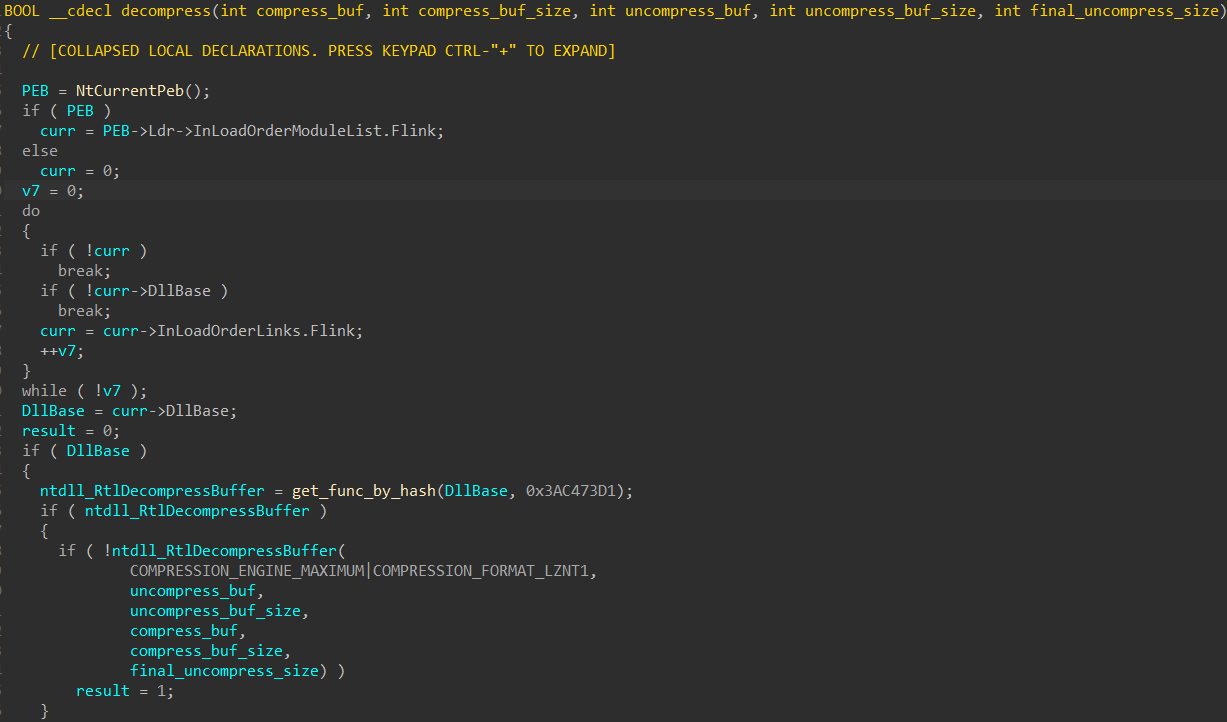
By adding the correct structure offsets in IDA, we can see that level2.exe resolves WinAPIs dynamically for use. This is achieved by first retrieving pointers to PEB and Ldr, and then walking through the forward pointers Flink of the doubly-linked InLoadOrderModuleList until it reaches the first entry which will be ntdll.dll because it is always loaded first in any process.
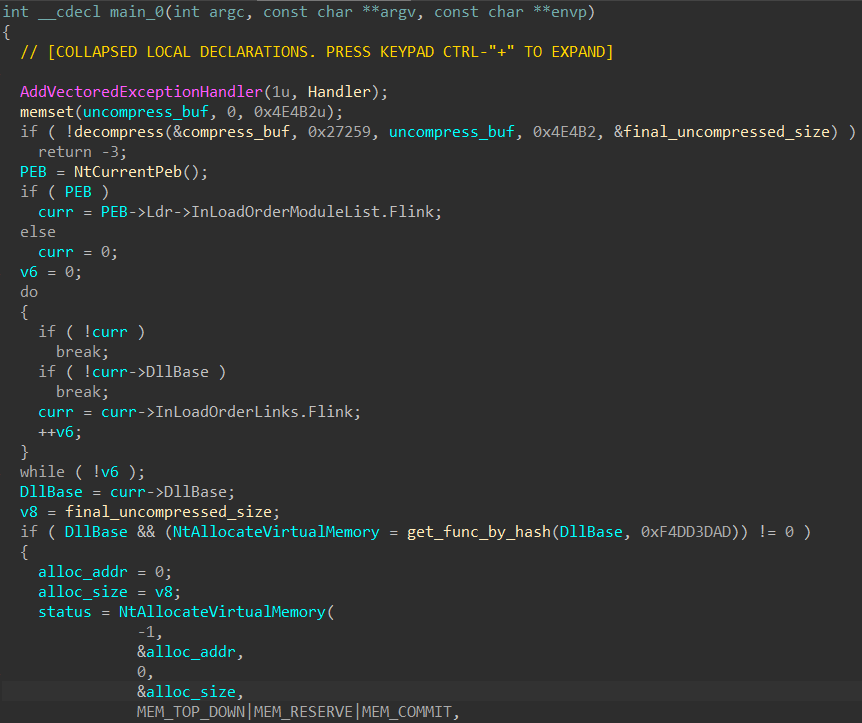
After obtaining the base address
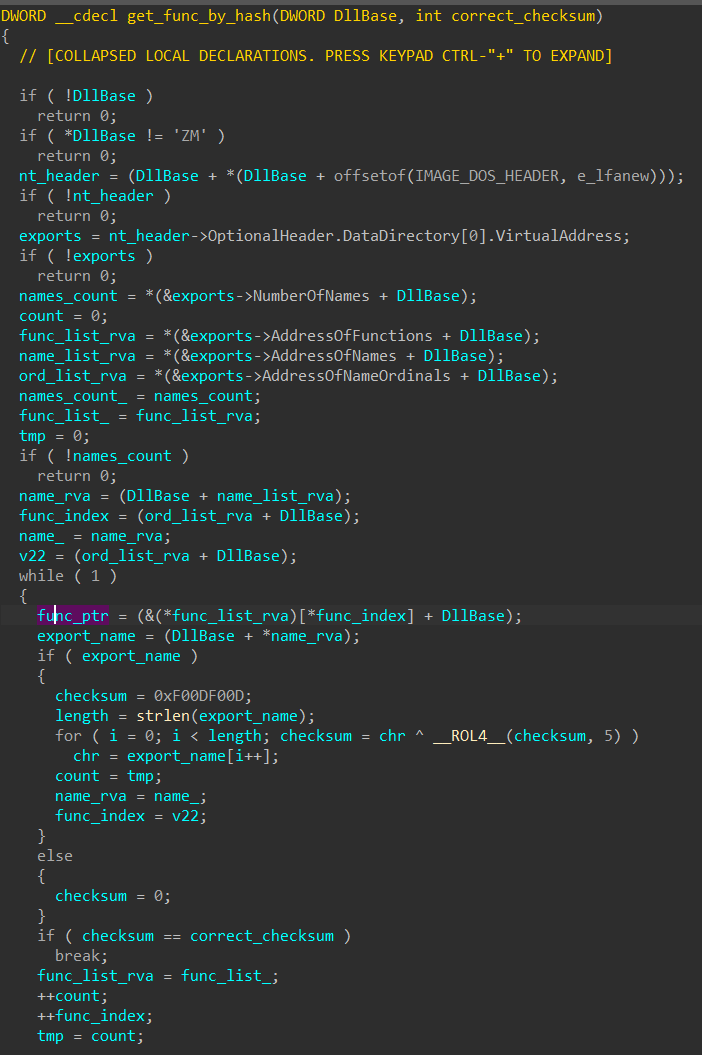
DllBase of ntdll.dll, it is passed into get_func_by_hash with a hash constant to retrieve the desired exported function address. This is done by iterating through the export directory table, hashing each export function name with a custom rotate and XOR routine, and then comparing the hash with the parameter passed in. If the correct function name has been found, the function pointer is returned.
PE Implant Decompression
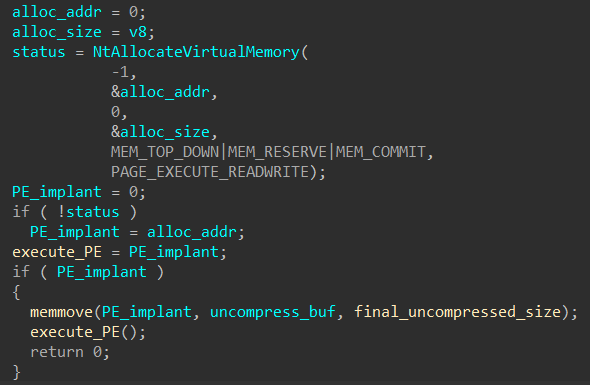
In the case of level2.exe, this dynamic resolution is used just twice to retrieve 2 functions: ntdll_RtlDecompressBuffer and NtAllocateVirtualMemory.
ntdll_RtlDecompressBuffer is used in decompress to LZ decompress a buffer of size 0x27259.
|
|
The decompressed data, which is actually a PE, is then moved into a new buffer allocated with
NtAllocateVirtualMemory. Finally, the PE is executed.
For ease of analysis, I dumped out this PE implant while debugging the
level2.exe process with pe-sieve using virtual dump mode (/dmode 1).
PE Implant
The first function called in the implant is for anti-analysis.
|
|
Anti-Analysis
Interestingly, all the code and functions in this subroutine are very similar to the snippets listed at https://github.com/hasherezade/antianalysis_demos.
check_debugger_present()checks bothIsDebuggerPresent()andCheckRemoteDebuggerPresent()as seen in classic_antidbg.cppis_kuser_shared_mapped()checksKUSER_SHARED_DATAas demonstrated in kernelmode_antidbg.cpp- The insertion of checksums into a
std::setstructureprocess_listused as a process name blacklist is shown in neutrino_checks.cpp
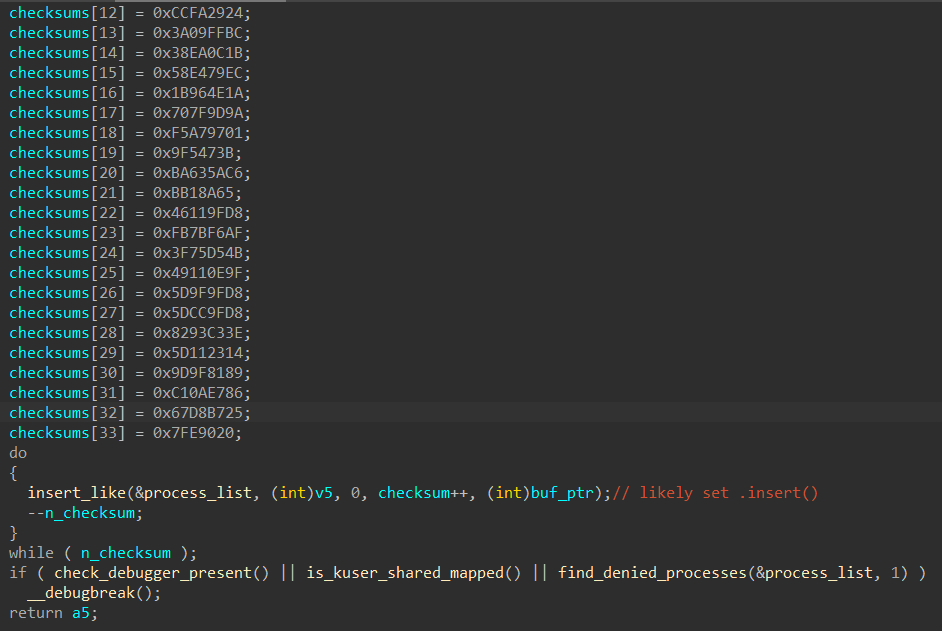
Even inside the
find_denied_processes function, the use of CreateToolhelp32Snapshot, Process32First, tolower, and a checksum calculation that involves left rotations and XOR operations are almost the same as that in the GitHub repository.
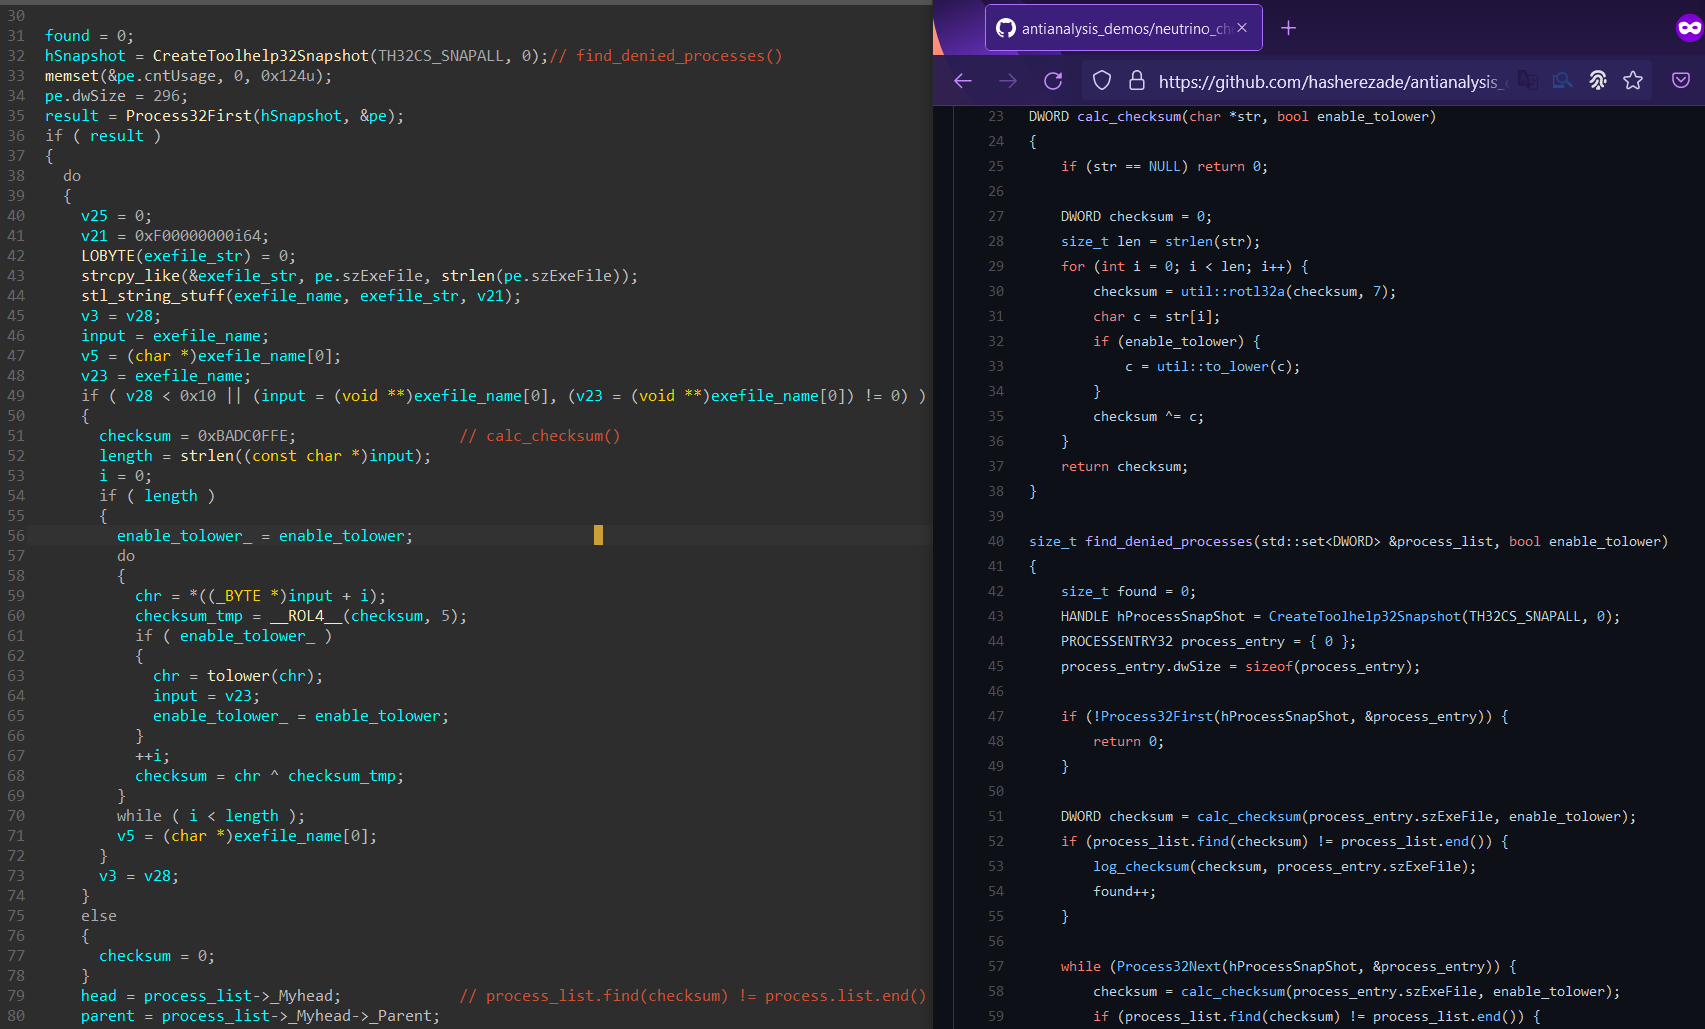
Referencing the left rotate function in util.h used for checksum calculation, we can recreate the function used in
level2.exe for process blacklisting as such:
|
|
Something to note is that IDA isn’t able to parse the C++ STL set container used for process_list, so I modified Rolf Rolles’ STL types identification IDAPython script to make the pseudocode more readable when methods like .find and .end are used.
Main
The next function called in the PE implant is main_stuff with the named pipe crackme_pipe and a port number 1337 as arguments.
|
|
A mutex is created as well as a thread for each of the next levels.
|
|
Password-checking subroutines are passed as parameters to the threads in addition to the named pipe string and port number for level 2 and level 3 respectively. I made a small structure in IDA to track this more conveniently:
|
|
Level 2 Thread
The created thread for level 2 creates and connects to the duplex named pipe crackme_pipe. The handle to the pipe and the level 2 password-check function address are then passed to another created child thread.
|
|
This next child thread reads from the pipe and calls the password-check subroutine on the data received which would be what we entered in the original .NET form. The output of the checking subroutine is then written to the pipe.
|
|
Level 2 Password Check
At the start of the password-checking subroutine, we can see 28 bytes of some sort of encoded/encrypted data being stored.
|
|
Next, our input password appears to have leading and trailing whitespaces trimmed.
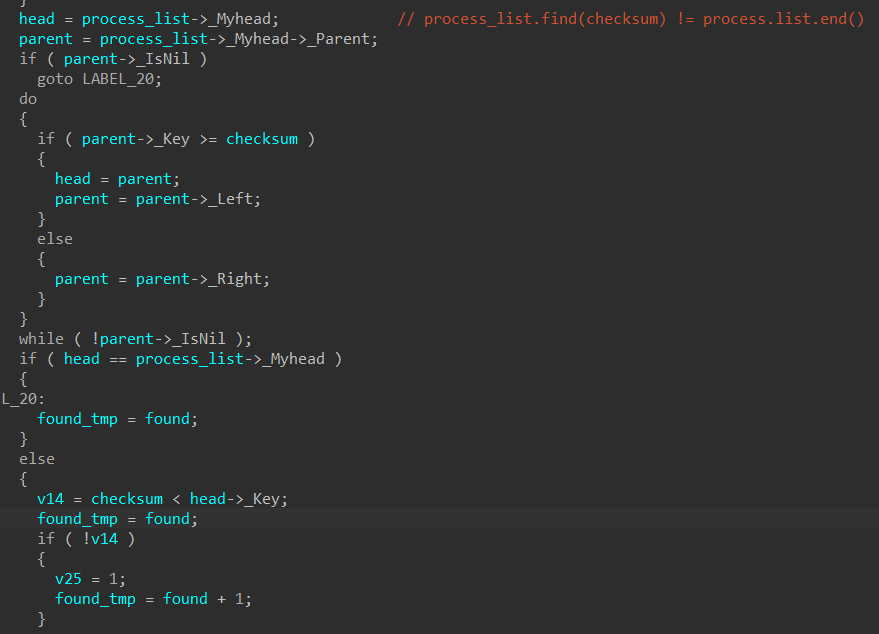
Then, its checksum is calculated according to the same algorithm used for the process blacklisting above in Anti-Analysis. Characters are converted to lowercase for the calculation of the checksum.
|
|
This checksum is checked to be found in the set of blacklisted process names created earlier.
|
|
If the checksum is present in the set of blacklisted process name checksums, our input password (in its original casing) is used as the key to RC4-decrypt, in-place, the encrypted block of data we saw being stored at the start.
The RC4 encryption/decryption scheme can be identified by recognition of the key-scheduling algorithm (KSA) and the pseudo-random generation algorithm (PRGA) code structures.
|
|
If the decrypted data passes the printable character checks below, it is sent back on the pipe for the .NET MBCrackme.exe process to read, check and display.
|
|
Essentially, we first need to find out what are the blacklisted process names. The password we want will be one of those.
Cracking The Password
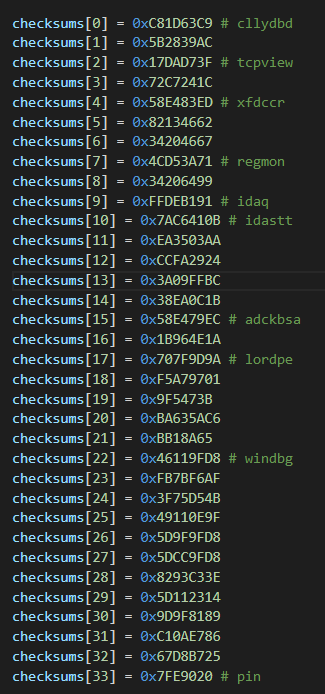
I initially wrote a multi-threaded Python bruteforcer to find out what process names mapped to the set of blacklisted checksums. While it did find what seemed to be legitimate process names like pin, windbg, and idaq, it was clearly too slow considering the possible lengths of process names. More problematically, it was also encountering checksum collisions - obviously nonsensical strings like adckbsa, xfdccr, and cllydbd would match the checksums. This approach was not the way.
I switched strategies and decided on a dictionary attack instead. I exported executable filenames from various paths inside Mandiant’s/FireEye’s FlareVM with
dir /a/s/b *.exe and modified my script to take in that list. That found a good number of process names but there were still quite a few left unknown.
The last idea I had in mind was to source for paths from online repositories collating malware evasion techniques like https://github.com/LordNoteworthy/al-khaser.
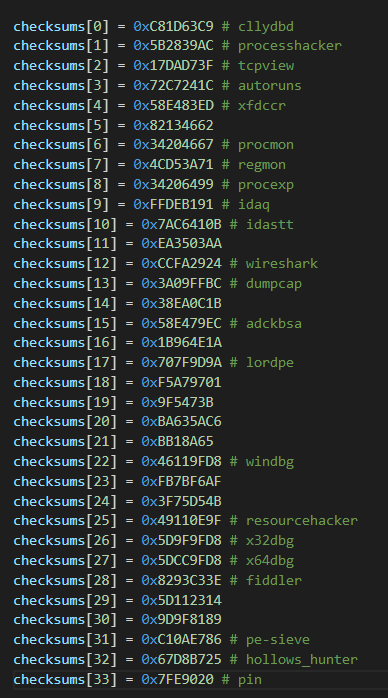
This turned out to be the best method as the final process blacklist was discovered to contain exactly the Al-Khaser AntiAnalysis process list in the same order.
It was only missing vmwaretray found in the Al-Khaser Anti-VM process list, pe-sieve and hollows_hunter found through the FlareVM dictionary attack method, and pin which was discovered through my initial bruteforce method.
|
|
Decryption
I tried each of them (lowercase) as the key to RC4 decrypt the 28 bytes of encrypted data we saw earlier (5A 95 58 F1 7C 6D 62 B5 C2 C6 8A D6 20 F2 F6 10 D8 8F EF 4C D6 63 46 8B 1A 0D BE A2) but all gave gibberish. So I used their original casings referenced from the Al-Khaser repository and ProcessHacker worked to give me we_are_good_to_go_to_level3! as the decrypted message. Decryption in CyberChef.
Stage 2 password: ProcessHacker
Stage 2 decrypted message: we_are_good_to_go_to_level3!
Stage 3
Reflective DLL Loading
Upon completion of level 2, the .NET executable calls LoadNext.Load(Form1.g_serverProcess, array); which basically reflectively loads a DLL and then invoke its RunMe method. The DLL is stored at LoadNext.EncArr and is first Base64-decoded, AES-256-CBC-decrypted, and Gzip-decompressed. The AES decryption uses the SHA256 hash of the Stage 2 decrypted message as a password along with a salt {5,3,3,7,8,0,0,8} and an iteration count of 1000 to derive the key and IV.
|
|
While debugging the .NET process after entering the passwords for Stage 1 and Stage 2, I used pe-sieve with /data 1 once the DLL has been loaded. This option scans non-executable pages in .NET applications, and dumped out the DLL Level3Bin.dll successfully.
DLL Injection
Level3Bin.dll is also a .NET executable so into dnSpy it goes!
The RunMe method calls GetTempFileName which creates a random file name with extension .dat in the %TEMP% folder.
|
|
DropTheDll Base64-decodes another DLL and writes it to the random file name created.
|
|
InjectToProcess finally injects this dropped DLL into the original level2.exe process using the conventional VirtualAlloc+WriteProcessMemory+CreateRemoteThread method.
|
|
I Base64-decoded and saved the DLL out manually for further analysis in IDA. I had to retrieve the really long Base64 string through IDA since dnSpy would truncate it.
API Hooking
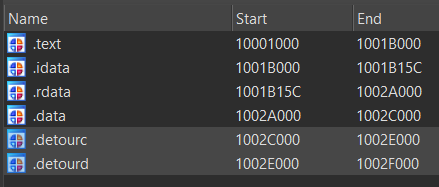
The DLL had the suspicious sections .detourc and .detourd.
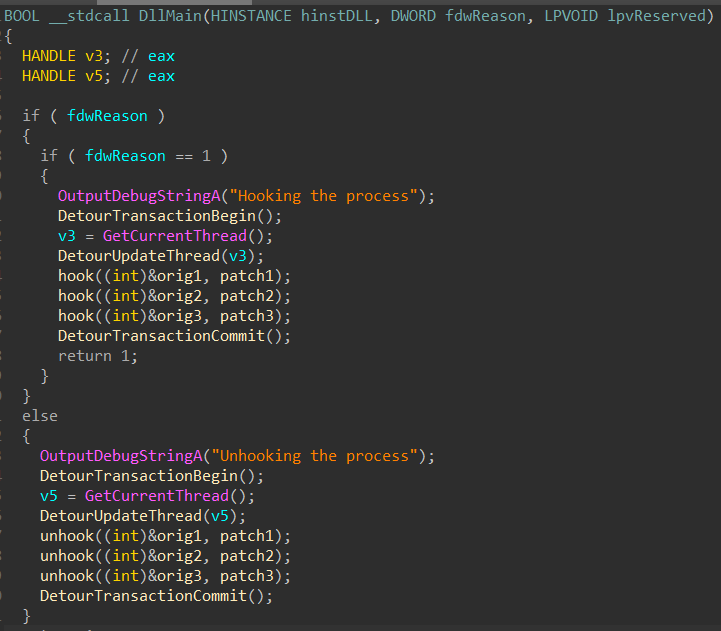
DllMain also had the strings Hooking the process and Unhooking the process so I searched that up in GitHub and found them being used in this MS Detours API hooking sample project by hasherezade herself. The sample project also utilized an injected DLL. With this knowledge, I had a rough understanding of what the function calls in DllMain were for.
To find out what were the functions being patched, I ran
level2.exe and then injected the DLL manually using dll_injector32. I ran pe-sieve again on the level2.exe running process and it detected hooks and helpfully dumped information into .tag files.
In crypt32.dll, CryptStringToBinaryA is hooked.
46d70;CryptStringToBinaryA->6c632990[6c630000+2990:injected.dll:0];5
In user32.dll, GetCursorPos is hooked.
27c00;GetCursorPos->6c632b10[6c630000+2b10:injected.dll:0];5
In KERNELBASE.dll, Sleep is hooked.
1249c0;Sleep->6c632b60[6c630000+2b60:injected.dll:0];5
PE implant
Let’s find where the hooked functions are called back in the code for level 3 in the PE implant.
Level 3 Thread
The created thread for level 3 creates a socket and binds to TCP 127.0.0.1:1337. It listens and accepts connections, passing recv’d data into the password-checking subroutine stored in the thread’s parameters.
|
|
The original .NET executable will communicate with the socket upon button3_Click.
|
|
Level 3 Password Check
At the start of the password-checking subroutine, we can see encoded/encrypted data once again being stored. This subroutine reuses the rc4_decrypt function we saw earlier for the level 2 password check so this data is probably RC4-encrypted as well.
|
|
CryptStringToBinaryA is then called on our input password for Base64-decoding.
|
|
The hooked version in the injected DLL still calls the original CryptStringToBinaryA, but also initializes a variable which we’ll call sleep_var to 4.
|
|
The Base64-decoded input is then run through the following routine where the cursor’s coordinates are supposedly used to modify and check the input in a loop.
|
|
But GetCursorPos is hooked to retrieve bytes from two arrays using sleep_var as an index instead of just returning the actual cursor’s coordinates:
|
|
The value y is used to do some rotation operations on our Base64-decoded input which is then checked with x.
On each loop iteration, Sleep is called which is hooked to increment sleep_var.
|
|
If the check passes, the Base64-decoded string goes through a printable character check and is then used as the RC4-key for decryption of the 72 bytes of encrypted data stored at the start. The final RC4-decrypted string also goes through the same printable character check and will be sent back in a TCP response if successful.
Solution Script
I reimplemented everything the hooked functions were checking for in Python to solve for the password:
|
|
which output something like this:

which means the Base64-decoded password is
small_hooks_make_a_big_difference.
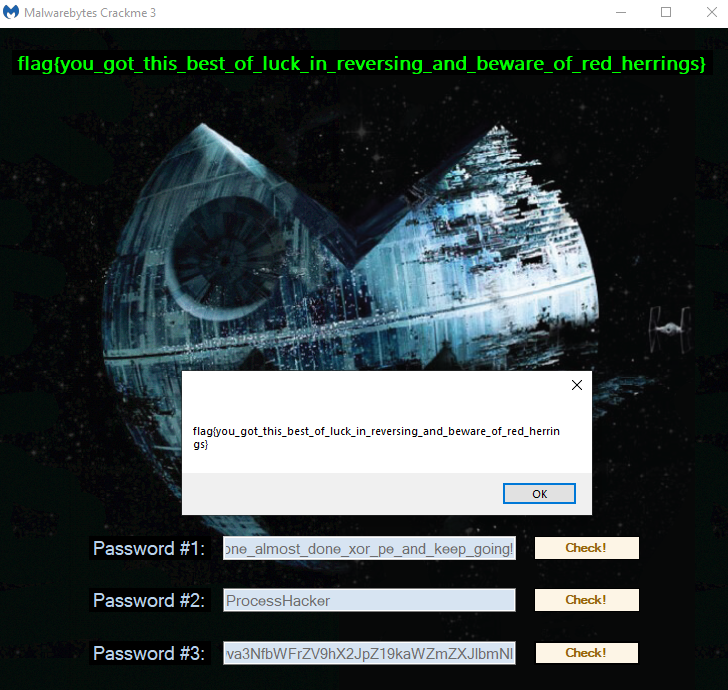
This password is then used to RC4-decrypt 7fb19ba3dbb87a983ee96b2facc4405a420f905f5cf19cab32791bf50ccaa306c4454a4af61d592141daf3c7baefeea32d0d82451735d334cbdcc3d7b35b5efa673fe269ef02415a which gives flag{you_got_this_best_of_luck_in_reversing_and_beware_of_red_herrings}. Decryption in CyberChef.
Stage 3 password: c21hbGxfaG9va3NfbWFrZV9hX2JpZ19kaWZmZXJlbmNl
Stage 3 decoded password: small_hooks_make_a_big_difference
Stage 3 decrypted flag: flag{you_got_this_best_of_luck_in_reversing_and_beware_of_red_herrings}
Thanks for reading!